Thanks, SOOOOO MUCH David!!! PLEASE don’t give up on me just yet! I think I’m close to getting this task completed but I just need a little more help!
I’m clueless when it comes to coding, but I’m capable of following step-by-step instructions. I got this far thanks to strangers such as yourself and the posters of YouTube videos like FutureCode and Nayelli. I got the Stripe integration backend code from this website which was linked to FutureCode’s video. Ido here on Wix suggested the code I’m currently using for the Change State function. I can’t tell you how appreciative I am for your help!! However . . . I’m experiencing the following problems: Problem #1: The total field doesn’t change on the screen when I make my selections. I’d like the user to be able to see their calculated total after they’ve made their editing type selection and then selected the number of pages they need edited. I’ve added a screenshot of the basePaymentDropdown ‘manage dropdown list’ manager in problem #3. Here’s what the manager looks like for the pricePerPage dropdown:
Problem #2: The card I tested using the Valid Visa Credit Card Generator website failed. I’ve updated my per page price to 1000 as per your suggestion and I got this error in the developer console:
Card token: tok_1CKcjMDggwDOjtd9TnDaiTdC
{“message”:“success”}
Charge ID: undefined
{“message”:“success”}
The Event on the Stripe dashboard says: A payment for 10.35 USD failed.
Problem #3
I’m sure I’m close now, because the base price for the service I selected for this test is $35.00 so it looks like I need to make the same type of adjustment to the base price options as you’ve suggested I make to the price per page. The problem with this is that I don’t know how. Here’s what my basePriceDropdown Manage Dropdown List looks like:
Problem #4: I need to figure how to connect my #desc field to the label associated with the option selected from the #basePriceDropdown field.
I solved Problem #3 by changing the basePriceDropdown values! Yayyyy for me and big thanks to YOU for that!
NOW . . . if I can just get you to help me with problems 1, 2 and 4 I’ll be even MORE grateful! For the sake of clarity:
Problem #1: How do I get the calculated total to show on the payment form where the user can see it?
Problem #2: Why did the credit card fail? (according to the credit card generator, the limit is 3366$
Problem #4: How do I get the #desc field to populate with the label of the basePriceDropdown option as opposed to the value?
Your changeState function calculates the total properly, but doesn’t actually add it to the page. So, in your chnageState function, after you calculate the total, I would add $w("#total).value = total; This will assign the calculated total amount to the total element on your page.
The fact that the code returns a token and a success message is a great sign. My guess is the credit card you’ve generated is invalid and Stripe’s system recognizes it, but the code works. To do testing, you should be using your Stripe Testing API Key, as opposed to your live key (this is the sk_xxxxxxx number in your backend). Then toggle your Stripe Dashboard to test data and it will show charges on that sk_Test key. This will track everything in a test manner without using funky third party credit card things. Also, here’s a link to Stripe fake credit cards you can use Test cards | Stripe Documentation
Just change it to .label. There’s a ton of information an dit is difficul to porcess at first, but I encourage you to utilize the wix API references: https://www.wix.com/code/reference/$w.Dropdown.html. If you scroll down in this link you’ll see it shows you can use .value or .label. This is your bible.
David, you’re a LIFE SAVER! I’m sure this is going to take me home just as soon as I can figure out how to implement your advice!!!
You said: " I would add $w(" #total ).value = total " . . . is this a ‘let’ function? Where should I add it?
GREAT ENCOURAGEMENT, GREAT ADVICE!!! THANK YOU!!!
I try and try to refer to the wix API reference for help, but you’re right - it’s difficult to process! I referred to it a hundred times before posting, but I keep getting the following error when I change it to .label:
I can’t for the life of me figure out how to fix it!
Can someone (ANYONE) PLEASE help me?
I really appreciate David’s help, but I’m still at an impasse! I’m trying to finish one of my payment form pages so that that user is able to select their service (from the basePriceDropdown field)and the number of additional pages (from the amount field) they need’. When they make their selections, the ‘total’ field should update (with the decimal point in the correct place) to reflect the price they’ll be charged, and the ‘description’ of the payment should update to reflect the label of the option they selected from the ‘basePriceDropdown’ field.
Here’s what my payment form looks like:
How to move to a “thank you” page following a Submission to stripe?
Hi all - I thought I would add to this very handy stripe listing (good idea btw).
My question I think is relativly simple.
I have a page on my site which submits data to a collection, and also launches a lightbox containing inputs for payment. When I input my data and submit it, the payment goes to stripe - all well and good. But what I would like to happen is that when the submit is pressed on the credit card details, that it then shows a “thank you” page from my site.
I have tried this several ways, and either I get the “thank you” page up and the payment doesnt work, or the payment works, but no “thank you”
Any thoughts much appreciated.
So this code in the light box which contain the payment details. Its the “paynow” button.
If I have the wixLocation element in there, it works but the payment fails to go through.
If the wixlocation is removed the payment completes , but obviosuly I dont have the ability to show a “thank you” or other such page.
I am sure this is probably something to do with having to wait for the payNow to complete, but I have to admit my coding skills are average.
export function payTest_click (event, $w) {
console.log(“clicked”);
payNow();
wixLocation.to(“/copy-of-thank-you”);
}
Need your payNow() function code as well. What is happening is your wixLocation code is running before the payNow function is completed. So, we either need to wait until PayNow is completed or just move the wixLocation into the PayNow function so we know exactly when to go to the link
Basically you’re telling the code execute the payNow function, which first creates a token, then and only after the token has been succesfully created, take that token and execute the charge function, then once that is complete, go to this link
Another newbie to code here… I want to learn it and am in a huge time crunch right now to get my client’s website integrated with Stripe. I have been trying to get this going for 3 days, literally been at my desk 12+ hours each day doing nothing but trying to get Stripe integrated. I was on the phone with them 4 times yesterday, which was not actually helpful, and beginning to feel really dense, having a total mind melt.
I followed a tutorial I found in the Wix group on Facebook using Javascript. I was successful both with test mode and live mode, but have a BIG problem, which is when I hit submit in the JavaScript form I created, the charge goes through, but there is no indication of it to the user, no success message or anything like that. I ended up hitting it 4x and my card was charged 4x (luckily just $1 each). As yet I know just about nothing regarding code, except for the crash course I have been getting watching tutorials, YouTube videos, searching the forum… which is where I found this thread this evening.
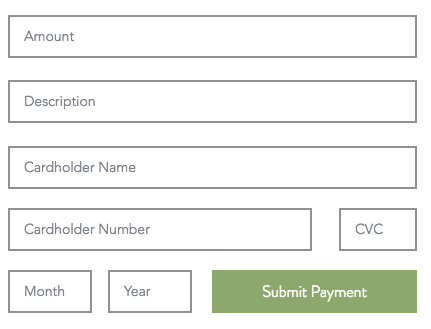
So I followed the HTML instructions using the iframe, and at first I was able to get the tokens at least, but I hadn’t created the “amount” or “description” input fields. So I did that, and I am still getting the token, but it’s not recognizing the amount and when I hit “submit payment” nothing happens on the user end, it just sits there. I tried to use some of what (I thought) I learned using Javascript, but am sincerely at a loss???
Here is what the code looks like from the first form I created and the form itself:
So when I got stuck I created the HTML form instead… the code is exactly what you posted at the start of the thread, I only changed the pk key. Here’s the page code that I copied/pasted with slight adjustment to figure in the amount and description. I’ve obviously done something wrong, though.
Make newElement some sort of “Complete!” text message or box. Essentially, after the code succesfully returns a ChargeResponse, it means the payment went through. In that case you can collapse the payment window and confirm to them it is complete.
Edit If you want to take it one step further you would have to edit the HTML code and Disable the submit payment button after it has been clicked. Shouldn’t be necessary though.
You have your wires crossed. Expand corresponds with collapse and hide with show. If you change your code to .show() intead of expand() it will work.
hide/show literally hides or shows your element visually, but it technically is still on the page. collapse/expand is basically minimizing or expanding that element.
You can build your website accordingly. You could do both, it really doesn’t matter
I am in dire need of some help. I have 0 code exp and i just build out a site without any and its great. i need some help with the code though. I had added the Stripe integration and have been able get tokens and card the card. I just want to be able to some how pull the email to stripe from that form so i can send auto receipts from Stripe.