Ok, back again to your problem.
Looking onto your description and the very good and informative video of AMANDA (Wix-Team), i think your problem is not about the Wix-Storage. I think it is more about how to setup your wanted functionality the right way.
The Video clearly explains everything about how Wix-Storage is working.
Your aim is what?
You want to transfer a value from PAGE-A to PAGE-B, right?
I want a value from a radio button to be passed to a “conclusion” page
So somewhere on PAGE-A you have your RADIO-BUTTON → user do interact with it (clicking onto it) → and exactly at that time you want to store the clicked value to your → SESSION-STORAGE ←
And i think at the same time you want also to navigate automatically to PAGE-B → “conclusion” page ???
.
Let’s make an example!
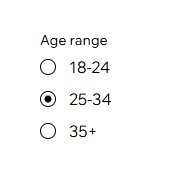
Let this be your RADIO-BUTTON-GROUP…

You start like always with the basics …
$w.onReady(function () {console.log('...page is ready...');
    let myRBG =  $w('#radioGroup1');
    let rbgOptions = myRBG.options; console.log('RBG-OPTIONS: ', rbgOptions);
    let rbgValue = myRBG.value; console.log('RBG-VALUE: ', rbgValue);
});
So what do we have here?
1) STARTING SEQUENCE…
$w.onReady(function () {
    ...START OF CODE... (when PAGE IS READY) !!!!
});
2) Some definitions…
let myRBG =  $w('#radioGroup1');
let rbgOptions = myRBG.options; console.log('RBG-OPTIONS: ', rbgOptions);
let rbgValue = myRBG.value; console.log('RBG-VALUE: ', rbgValue);
a) getting your RADIO-BUTTON-GROUP-ELEMENT and define it into a variable, called myRGB… → thisfor you also give it a 3-char prefix like → rgb ← normaly, but in this case we just call it → myRGB <—
let myRBG = $w('#radioGroup1');
b) Grabbing the options of → myRGB ←
let rbgOptions = myRBG.options; console.log('RBG-OPTIONS: ', rbgOptions);
c) Getting the values of → myRGB ←
let rbgValue = myRBG.value; console.log('RBG-VALUE: ', rbgValue);
So your current total code on PAGE-A would look like…
$w.onReady(function () {
    let selectedOption = undefined;
    let myRBG =  $w('#radioGroup1');
    let rbgOptions = myRBG.options; console.log('RBG-OPTIONS: ', rbgOptions);
    let rbgValue = myRBG.value; console.log('RBG-VALUE: ', rbgValue);

    myRBG.onChange(()=>{
        rbgValue = myRBG.value; console.log('CHOSEN RBG-VALUE: ', rbgValue);
        selectedOption = myRBG.options; console.log('CHOSEN RBG-OPTION: ', selectedOption);
    });
});
Ok, as you can see i did already even implement some further code parts…
d) New variable → which we will use for selected value (THIS IS WHAT YOU NEED)
let selectedOption = undefined;
e) Using the → onChange() trigger to determine the current selection…
myRBG.onChange(()=>{...});
But if you will take a look onto all the implemented CONSOLE-LOGS (using them inside of your web-browser’s → CONSOLE <–), you will recognize that this setup is still not complete, why ???
Because for CHOSEN-OPTION you still get → all of OPTIONS, instead of the current selected one, when you do your selection. (yes you already could work with values, but we want to make it complete right?) ![]()
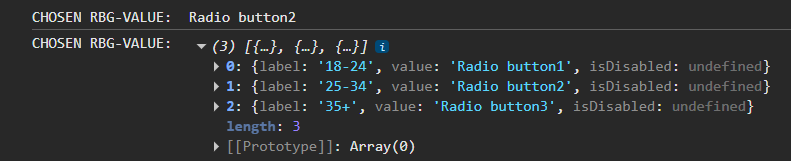
So, currently we already do get the selected values, but still missing the currently selected option.
SOLUTION: (After some minor modifications and upgrades…
$w.onReady(function () {
    let selectedOption = undefined;
    let selectedLabel = undefined;
    let selectedIndex = undefined;
    let myRBG =  $w('#radioGroup1');
    let rbgOptions = myRBG.options; console.log('RBG-OPTIONS: ', rbgOptions);
    let rbgValue = myRBG.value; console.log('RBG-VALUE: ', rbgValue);

    myRBG.onChange((event)=>{console.log(event);
        rbgValue = myRBG.value; console.log('CHOSEN RBG-VALUE: ', rbgValue);
        selectedOption = myRBG.options[event.target.selectedIndex]; console.log('Selected-OPTION: ', selectedOption);
        selectedLabel = event.target.label; console.log('Selected-LABEL: ', selectedLabel);
        selectedIndex = event.target.selectedIndex; console.log('Selected-INDEX: ', selectedIndex);
    });
});
Check this…

So which of the RGB’s OPTIONS has been chosen/selected ???
RIGHT —> The second one !!!
Now you learned how to work with a → RADIO-BUTTON-GROUP <— !!!
- You have your VALUE
- You have your OPTION/LABEL
- You even have the INDEX !!!
What next ???

Now you can take those values and put them into the Wix-Storage ![]()