Hey,
From your answer, it seems that you are looking to achieve 2 things:
- The ability to detect when a visitor has already opted out of Google Analytics - If he did, then disable the Google Analytics pixel from sending data for this session.
- Create a way for visitors to opt out of Google Analytics by clicking on a button.
You can achieve both by implementing your Google Analytics pixel via Google Tag Manager instead of adding it directly to your site.
Note : The following instructions require a basic understanding of Google Tag Manager. If you aren’t familiar with it, check out Google’s official help page here .
How to add Google Analytics via Google Tag Manager
- Remove the Google Analytics pixel from your site.
- Add the Google Analytics pixel via Google Tag Manager by following the instructions here .
How to check if a visitor has opted out of GA using GTM
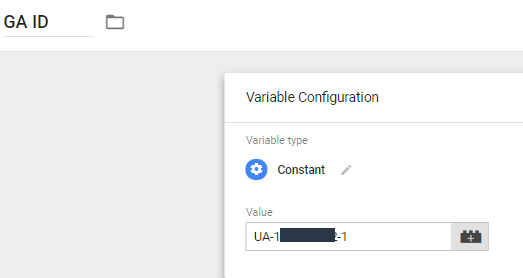
Step 1 : Create a new GTM variable that will hold your GA ID
To add a new variable, open your GTM account and go to ‘Variables’.
Click the ‘New’ button, and add the following information to your variable.
The new variable should be:
Type : Constant
Value : Your Google Analytics ID.
Variable Name : GA ID
Step 2 : Create a new custom variable for the relevant 1st Party Cookie
This variable will hold the value currently set for the GA Opt-Out options. We can use this variable to know if this is set to ‘True’ or ‘False’.
Type : 1st-Party Cookie
Cookie Name : _ga_opt_out
Variable Name : “cookie ga opt out”
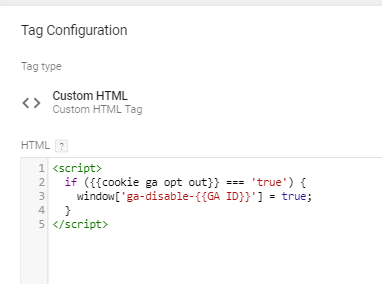
Step 3 : Create a new ‘Custom HTML’ tag to check if visitor already opted out
The code in this tag will run on every page, before our GA code. If cookie value is set to ‘True’, the tag will disable GA from running on this site.
Type : Custom HTML
HTML :
Tag Name : “if opt out, disable GA”
Step 4 : Run the new ‘Custom HTML’ tag on every page, before the Google Analytics pixel
To do so, open ‘Advanced Settings’ > ‘Tag Sequencing’ > Enable the ‘Fire a tag before’ option and add the name of the tag we created in step 3.
That’s it! Now every time Google Analytics will run on any of your pages, it will first check that the user has not opted out of Google Analytics.
How to let visitors opt out of Google Analytics on your Wix site
Before getting started, add an ‘Opt Out of GA’ button to your site. Where to add this button is entirely up to you and should be based on the experience you want to provide.
Keep in mind : This part of the tutorial assumes you have already implemented the instructions outlined above.
Step 1 : Create a GTM trigger to catch any clicks on the button you created
To add a new trigger, open your GTM account and go to ‘Triggers’.
Click the ‘New’ button, and add the following information to your trigger.
Trigger Type : Click - All Elements
Condition : Only when ‘Click Text’ contains ‘Opt Out of GA’
Trigger Name : Disable GA
Note : Make sure that the text on this button is unique to this button and does not appear anywhere else on the site. This is to make sure that the trigger will only be activated when this button is clicked. In this example, the button text is ‘Opt Out of GA’, but you can add any text you want.
Step 2 : Create a ‘Custom HTML’ Tag and connect it to the trigger we defined in step 2
Tag Type : ‘Custom HTML’
HTML :
Tag Name : ‘Disable GA’
Note : In the HTML, the {{GA ID}} part is based on the name you gave the variable that holds your Google Analytics ID. If you saved it under a different name, add that name instead.
That’s it. Now every time a visitors clicks on the button you created, the trigger should tell the tag to fire and it will disable GA from sending any further data for this specific visitor.
I hope this helps.
Thanks,
Adam